If you’re running a WooCommerce store, you already know how important it is to keep your product catalog neat, up-to-date, and easy to manage. However, let’s be honest. When dealing with a large inventory, manually handling it can feel overwhelming and often leads to mistakes.
That’s where import-export plugins come to the rescue.
With WebToffee’s free Product Import Export for WooCommerce plugin, you can easily move products in and out of your store in just a few clicks. Whether you’re updating prices, adding new items, or backing up your catalog, this tool saves you hours of work and helps you avoid costly errors.
In this article, we’ll walk you through how to use the plugin step by step, so you can manage your products more efficiently and focus on growing your business instead of wrestling with spreadsheets.
Table of Contents
How to Export WooCommerce Products
Managing your store data becomes so much easier when you can quickly download and back it up. With the free Product Import Export for WooCommerce plugin, you can export all your store’s products into a clean CSV file in just a few clicks.
This CSV file can then be used as a backup, shared with suppliers, or even imported into another WooCommerce store.
Here’s a simple step-by-step guide to exporting products using the plugin:
Step 1: Install and Activate WebToffee Product Import Export Plugin
Before you can start exporting products, you’ll need to install the Product Import Export for WooCommerce plugin. It’s free, simple to set up, and available in the WordPress plugin directory.
Here’s how you can do it:
- Log in to your WordPress dashboard and go to Plugins > Add Plugin.
- In the search bar, type Product Import Export for WooCommerce.
- Once you find it, click Install Now.
- After installation, hit Activate to enable the plugin on your store.
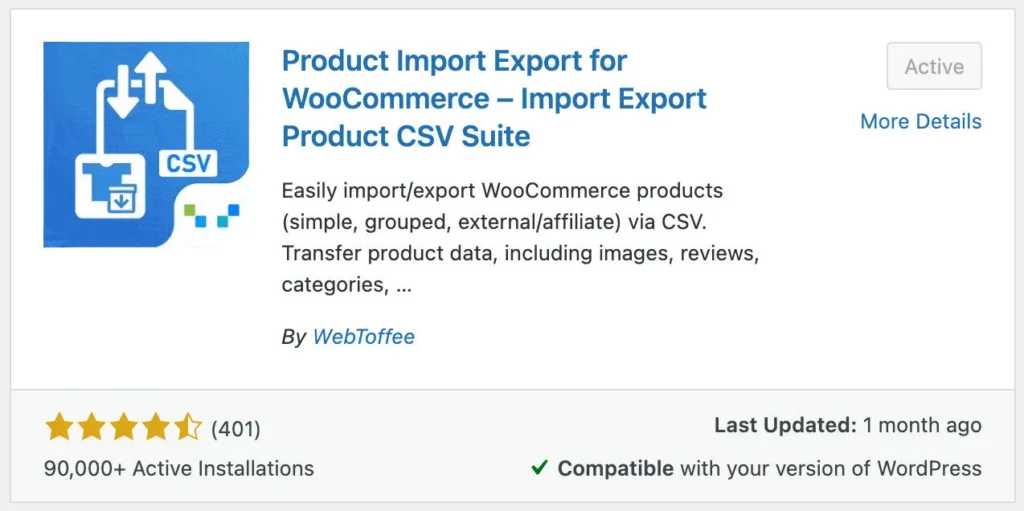
Now that your plugin is ready to use, you can proceed with exporting your WooCommerce products.
Step 2: Choose Product as Post Type
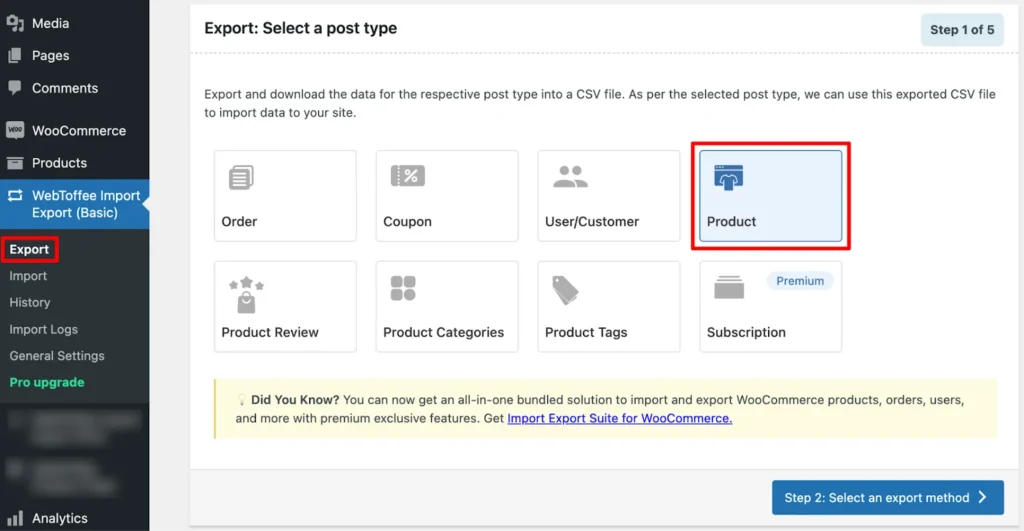
- In your WordPress dashboard, go to WebToffee Import Export (Basic) > Export.
- From the list of options, select Product as the post type you want to export.
- Proceed to the next step.
Step 3: Select an Export Method
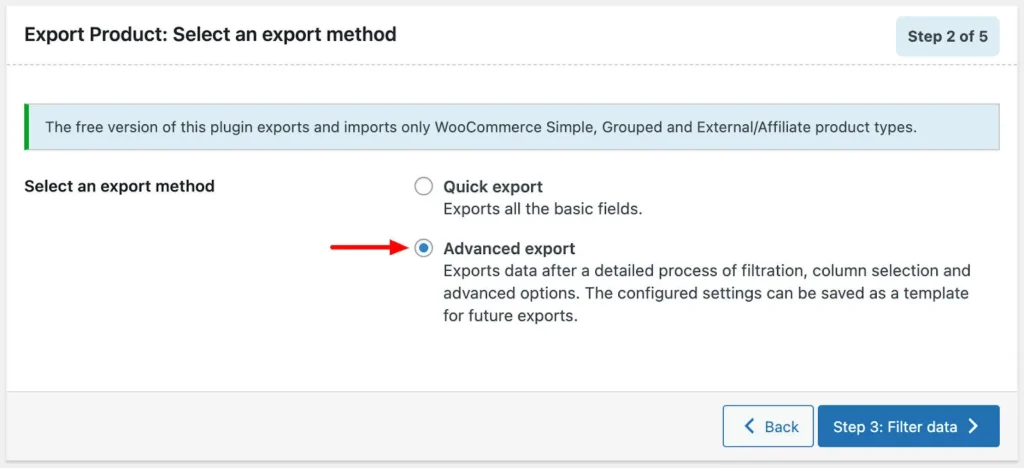
At this stage, the plugin will prompt you to select how you want to export your products. You’ll see two options:
- Quick Export: Ideal for exporting all your products with basic details in one click. It’s fast, simple, and hassle-free.
- Advanced Export: Ideal if you require more control. With this option, you can filter products by category, type, or status, choose specific fields to include, and fine-tune the export to match your exact needs.
For this guide, let’s go with Advanced Export so you can see how to customize your export file.
Step 3: Filter Your Export Data
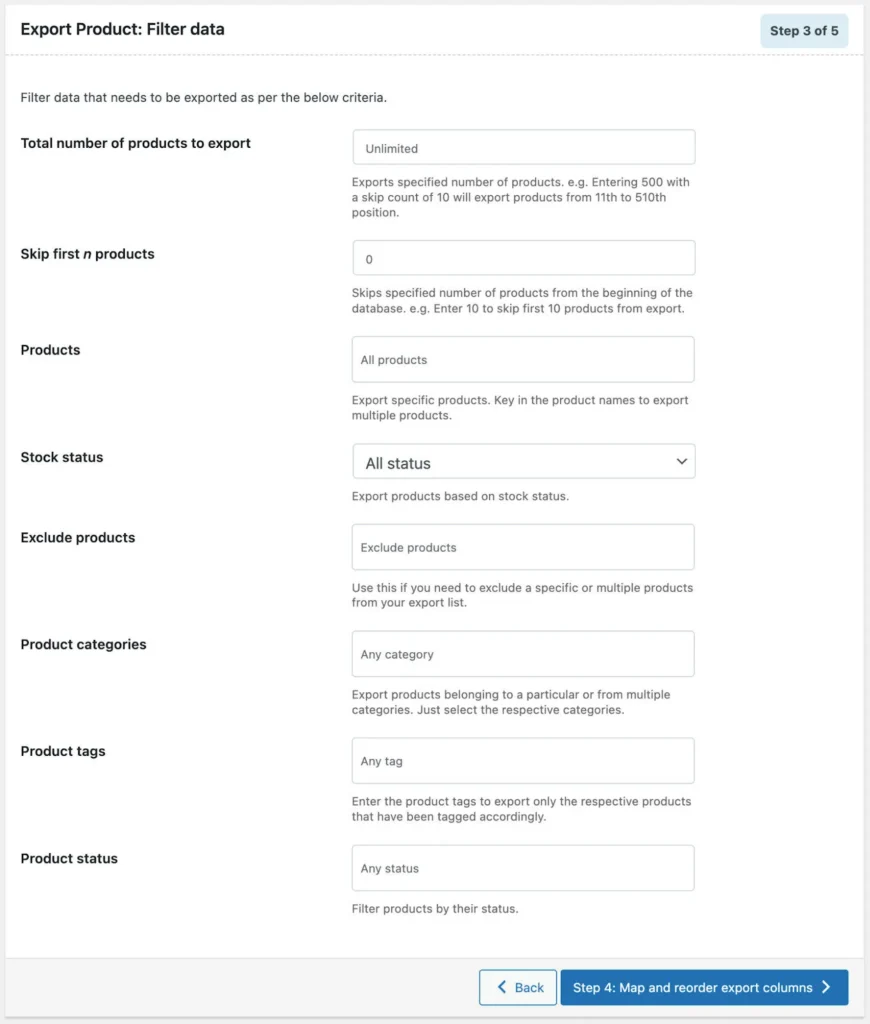
Now it’s time to narrow down precisely what you want to export. The plugin provides flexible filtering options, allowing you to export only what you need without having to export everything at once. You can:
- Total number of products to export: Export only a certain amount instead of your entire catalog.
- Stock status: Export products according to their stock availability.
- Skip first n products: This is handy if you want to exclude the first few products.
- Product categories or tags: Export only products from specific categories or with certain tags.
- Product status: Filter and export products according to product status.
Adjust these settings based on your needs. Once you’re happy with your selections, proceed to the next step.
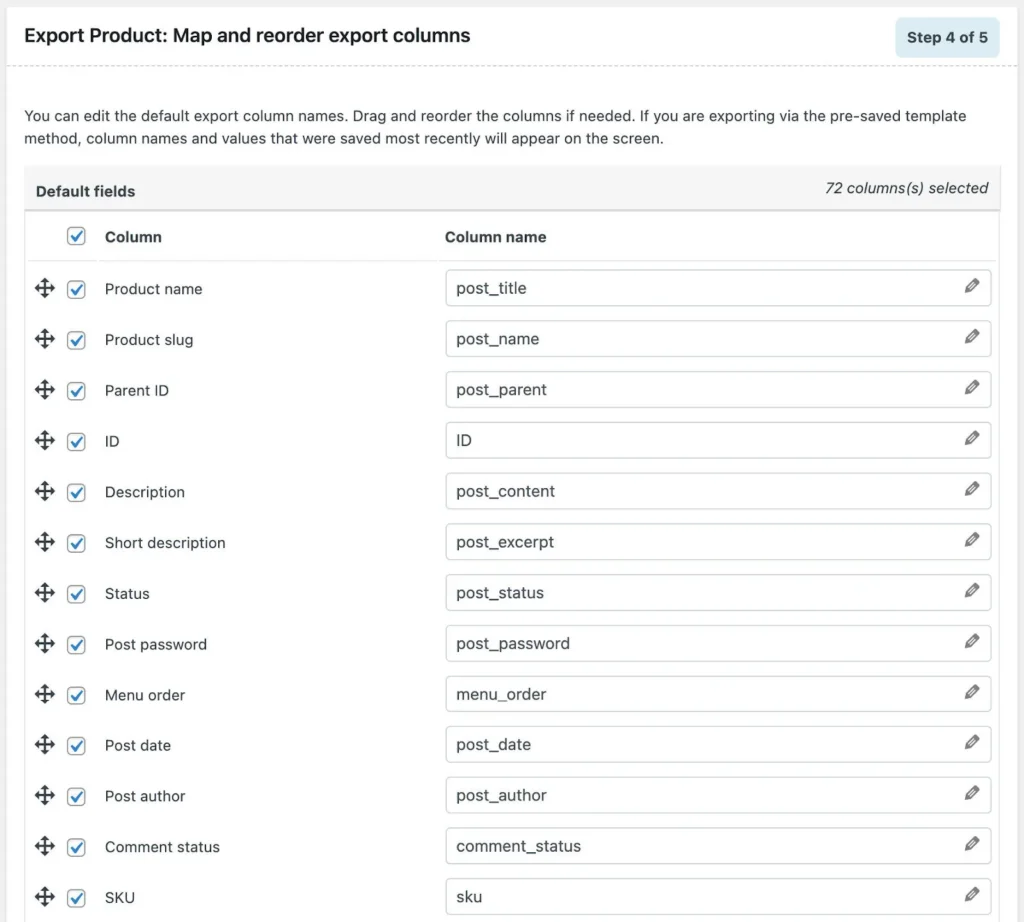
Step 4: Map & Reorder Columns
In this step, you get to decide how your export file will look. The plugin lets you:
- Choose the product data columns you want to include in the export (like product name, SKU, price, stock, etc.).
- Rename the columns so they appear with custom labels in your CSV file.
- Rearrange the order of columns by simply dragging and dropping them into the sequence you prefer.
This flexibility ensures your export file is organized exactly the way you need it, whether it’s for reporting, sharing with suppliers, or importing into another system.
Step 5: Export Your Products
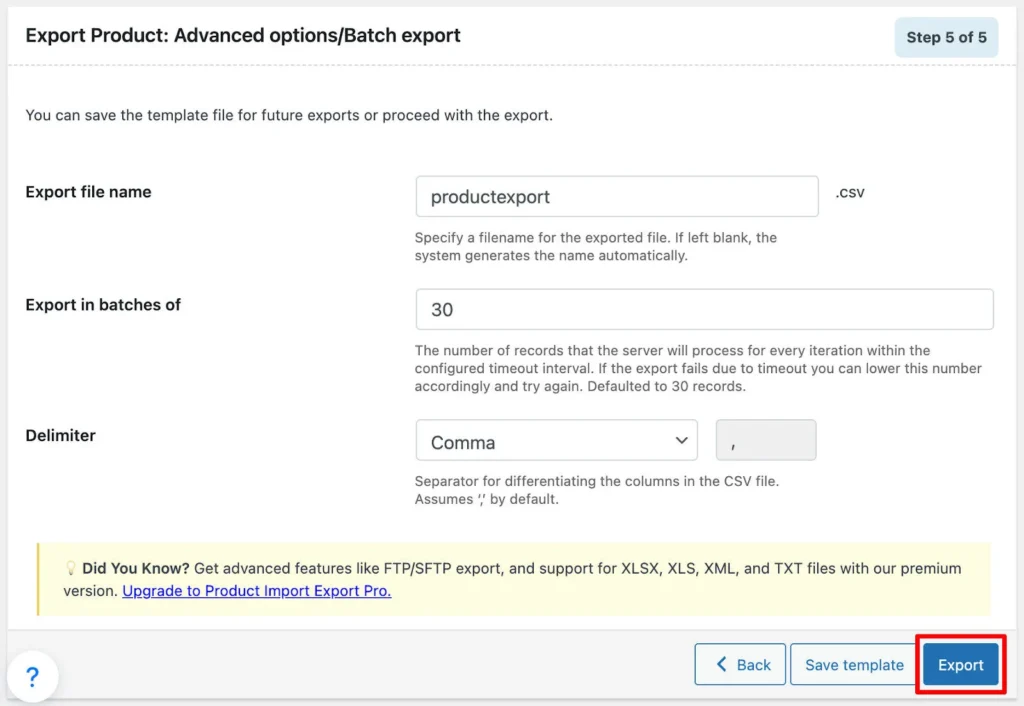
You’re now ready to generate the export file. In this final step, you’ll need to configure the following settings.
- Export file name: Give your export file a name so it’s easy to identify later.
- Export in batches of: This controls how many records the server processes at a time. (Useful for large product catalogs to make sure the export runs smoothly without timing out.)
- Delimiter: Usually a comma (,), but you can select another symbol if needed to separate columns in your CSV file.
Once everything is set, click Export. The plugin will create your CSV file, and you can download it directly to your computer.
Now you have a neatly organized export of your WooCommerce products, ready for backup, migration, or sharing.
How to Import WooCommerce Products
Just like exporting, you can also use the Product Import Export for WooCommerce plugin to bring products back into your store or even transfer them to a completely different WooCommerce site.
Before you begin, make sure your CSV file is properly formatted and saved in UTF-8 encoding. This ensures that all product details (like names, descriptions, and special characters) are imported correctly without errors.
Once you’ve got your CSV file ready, follow these steps to import products into WooCommerce using the free plugin:
Step 1: Select Products As the Post Type to Import
To get started with the import:
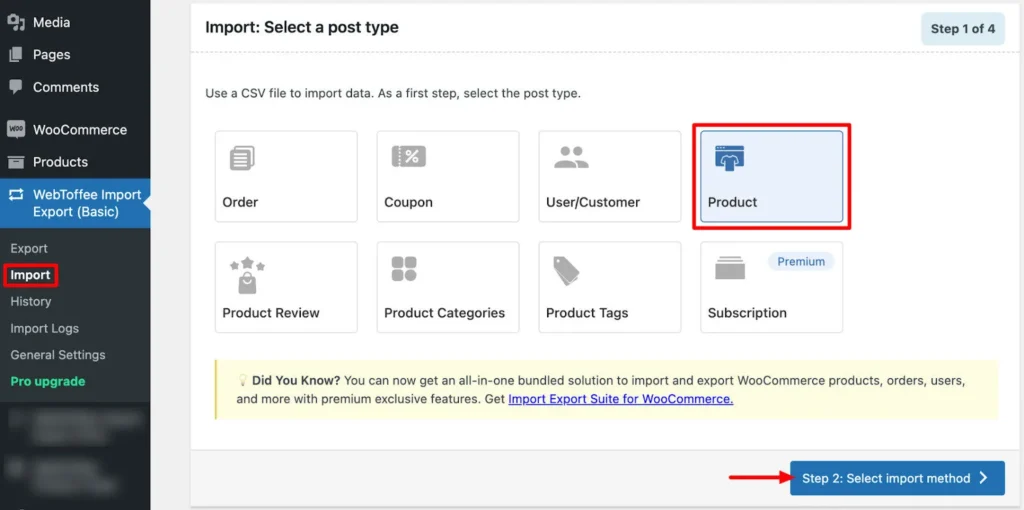
- From your WordPress dashboard, go to WebToffee Import Export (Basic) > Import.
- From the options, choose Product as the post type you want to import.
- Proceed to the next step.
This tells the plugin that you’ll be importing product data (and not orders, users, or other post types).
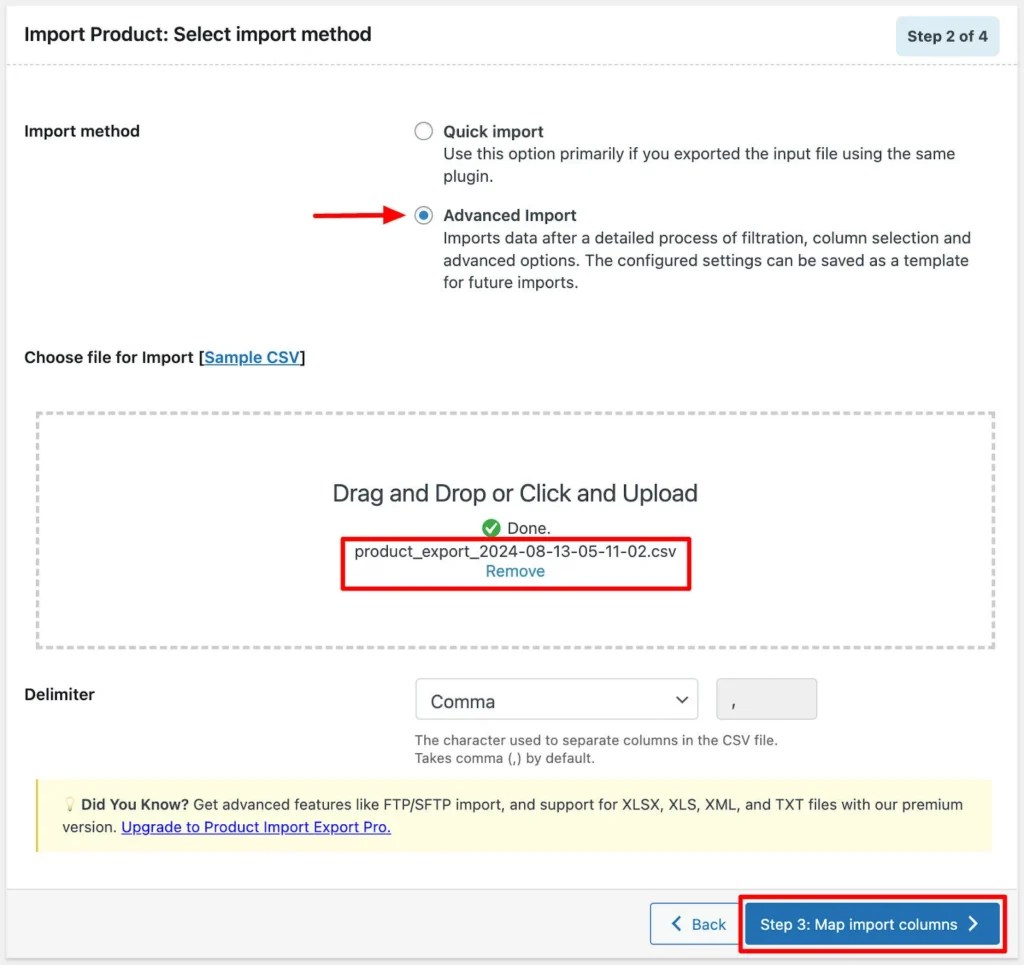
Step 2: Choose an Import Method
Now, decide how you want to import your products. The plugin gives you two options:
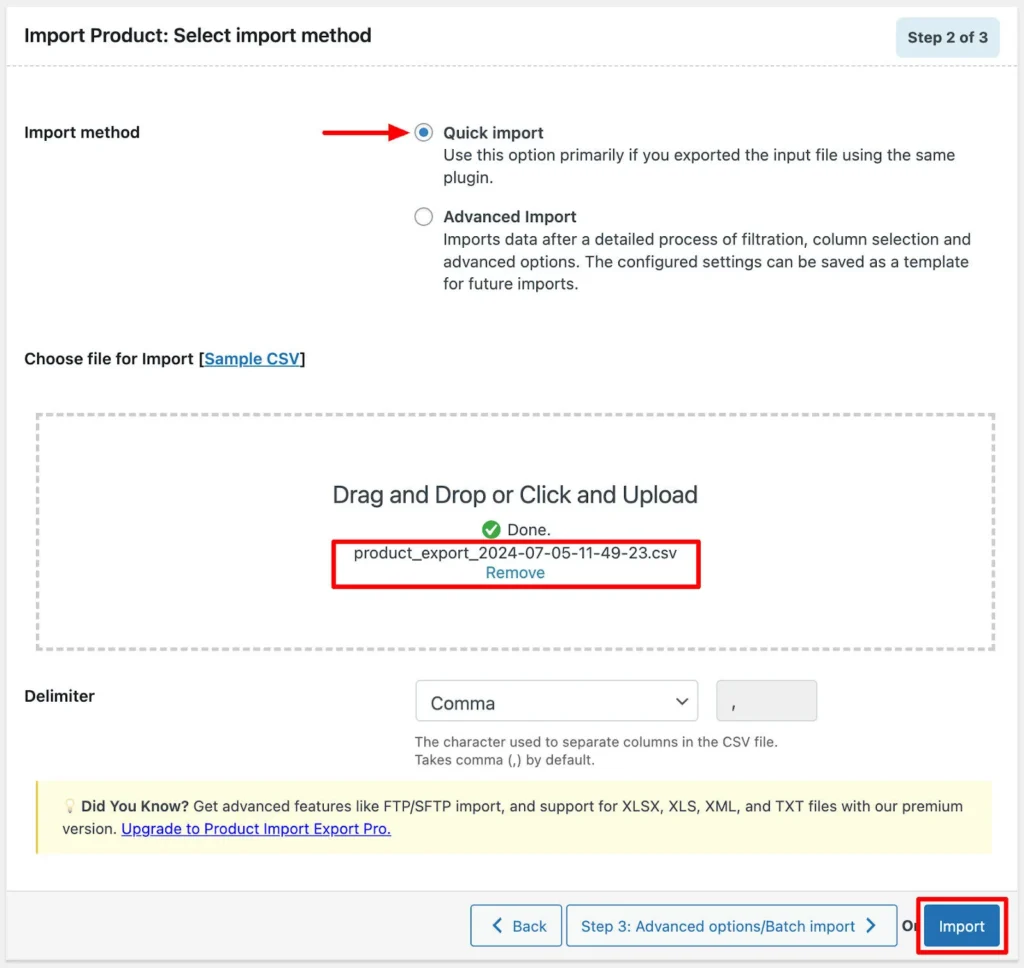
- Quick Import: Best if you previously exported a CSV file using the same plugin. All you need to do is upload that file and hit Import. The plugin will automatically recognize the data and bring your products back into WooCommerce with minimal effort.
- Advanced Import: Use this if you need more control over the process, such as mapping fields or applying filters before importing.
For most cases, especially if you’re re-importing an export file, Quick Import is the fastest and simplest option.
If you want more control over how your product data is imported, go with the Advanced Import option. Here’s how it works:
- Upload your CSV file: Choose the file from your computer that contains the product data.
- Select a delimiter: Pick the symbol that separates the columns in your CSV (commonly a comma).
- Click Map import columns: This takes you to the next step, where you can match your CSV columns with WooCommerce product fields.
The Advanced Import method is perfect when your CSV file has custom fields or a different structure that needs a bit of tweaking before import.
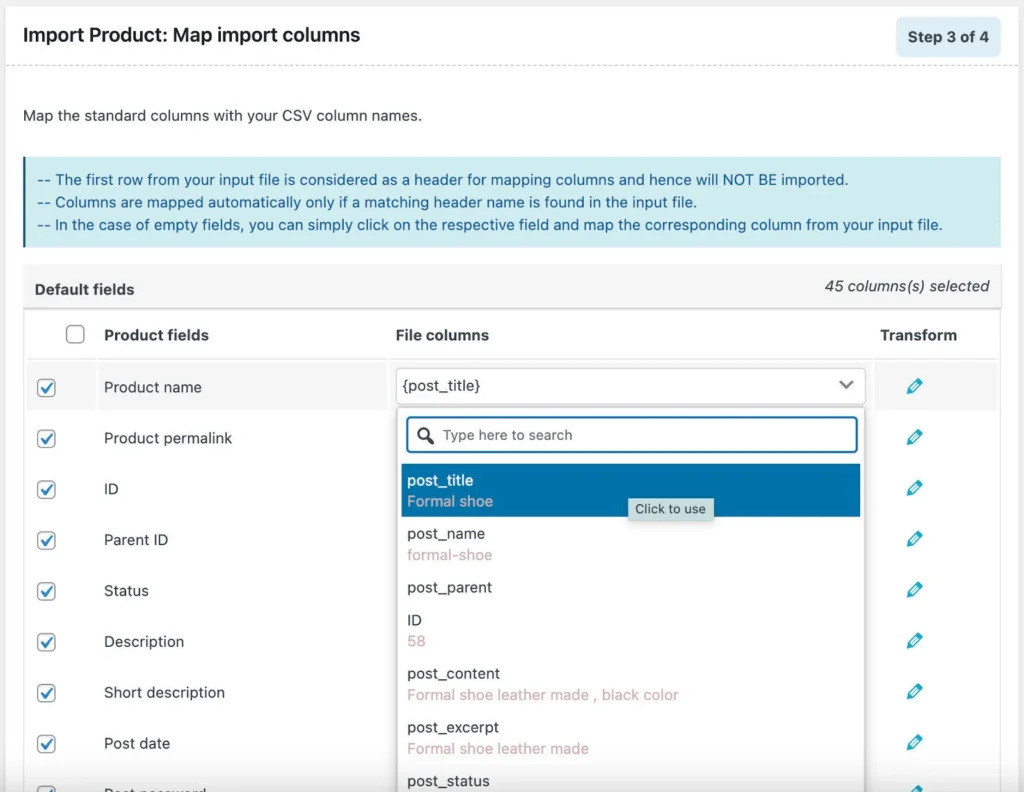
Step 3: Map & Reorder Columns of Product CSV File
In this step, you’ll decide how the data from your CSV file should align with WooCommerce product fields. The plugin will auto-map matching headers for you whenever possible.
For any unmatched or custom fields, you can:
- Manually select the correct WooCommerce field for each column.
- Skip fields you don’t want to import.
- Save your mapping so you can reuse it for future imports without repeating the process.
You can also reorder the columns to control how the data is structured during import. Once everything looks good, click Advanced options/Batch import to move forward.
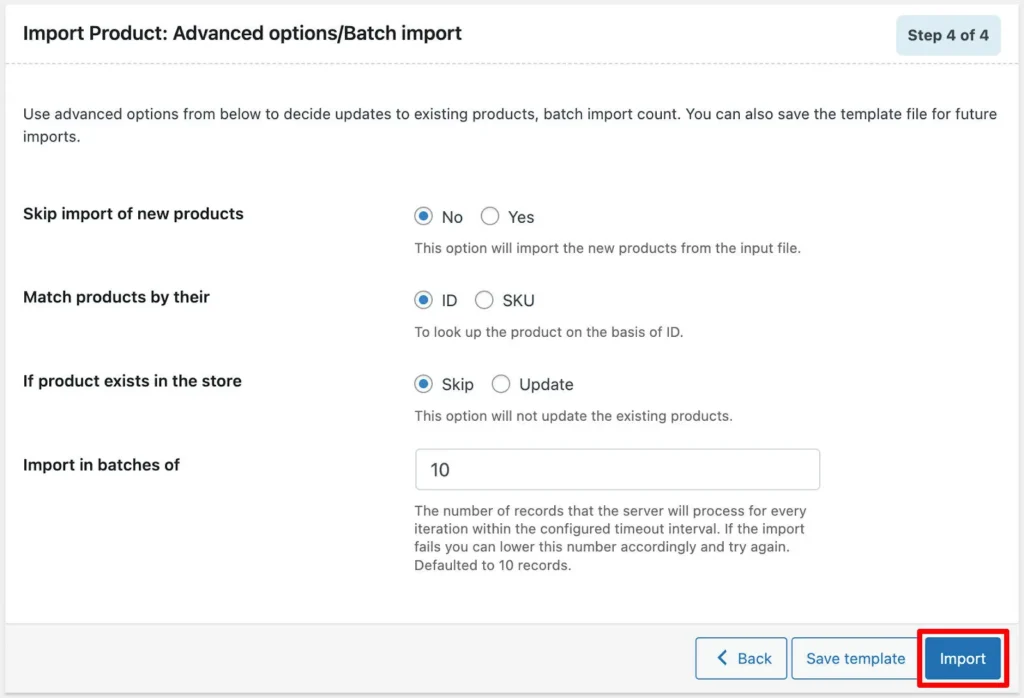
Step 4: Configure Advanced Import Options
Before finalizing the import, the plugin gives you a few advanced settings to fine-tune the process:
- Choose whether to add new products: Decide whether to skip new entries or allow them to be imported.
- Select a matching field: Use Product ID or SKU to identify and match products during import.
- Handle existing products: Choose whether to skip them or update them with the new data from your CSV.
- Set a batch size: Define the number of products to be processed in each batch. This helps avoid timeout issues if you have a large product catalog.
Once you’ve configured these options, click Import, and the plugin will bring your products into WooCommerce from the CSV file.
Step 5: Review Import Status
Once the import is complete, you’ll see a pop-up summary of the process. This report shows:
- The number of products successfully imported
- Any errors or issues that may have occurred
This makes it easy to verify that your data has been imported correctly.
Unlock More with the Premium Version
While the free plugin covers the basics really well, upgrading to the premium version of the WooCommerce product import export plugin gives you a lot more flexibility and advanced features to manage your product data more efficiently.
Here’s what you get with the premium upgrade:
- Broad Product Type Support: Import and export not only simple products, but also variable, grouped, external, subscription, and even custom product types.
- Multiple File Format Compatibility: Work with CSV, XML, TSV, and Excel files, instead of being limited to just CSV.
- Custom & Metadata Handling: Transfer custom fields, hidden metadata, and even data from third-party plugins.
- Advanced Export Filters: Selectively export products with powerful filtering options.
- Field Mapping & Data Transformation: Map fields and apply bulk data transformations during import for cleaner, customized results.
- FTP/SFTP Transfers: Import or export files via FTP or SFTP for faster, more automated workflows.
Scheduled Automation: Set up recurring import and export tasks to run automatically at regular intervals.
With these features, the premium plugin makes bulk product management much smoother, especially for larger stores or complex catalogs.
Summing Up
Moving to a new platform or handling a large WooCommerce store doesn’t have to be a stressful experience, especially when it comes to managing your product catalog. The Product Import Export for WooCommerce plugin takes the heavy lifting off your hands, making it easy to transfer products quickly, accurately, and without any errors.
But that’s just the beginning. WebToffee also offers a range of powerful tools like the WooCommerce Order Import Export and WordPress Users Import Export plugins, so you can transfer orders and user data just as smoothly.
We hope this guide has given you a clear roadmap to simplify your import-export tasks and save you valuable time while running your store. Have any questions or tips to share? We’d love to hear from you in the comments below.
Read also about 16+ Must-Have WordPress Plugins for Your WooCommerce Store


Leave a Reply